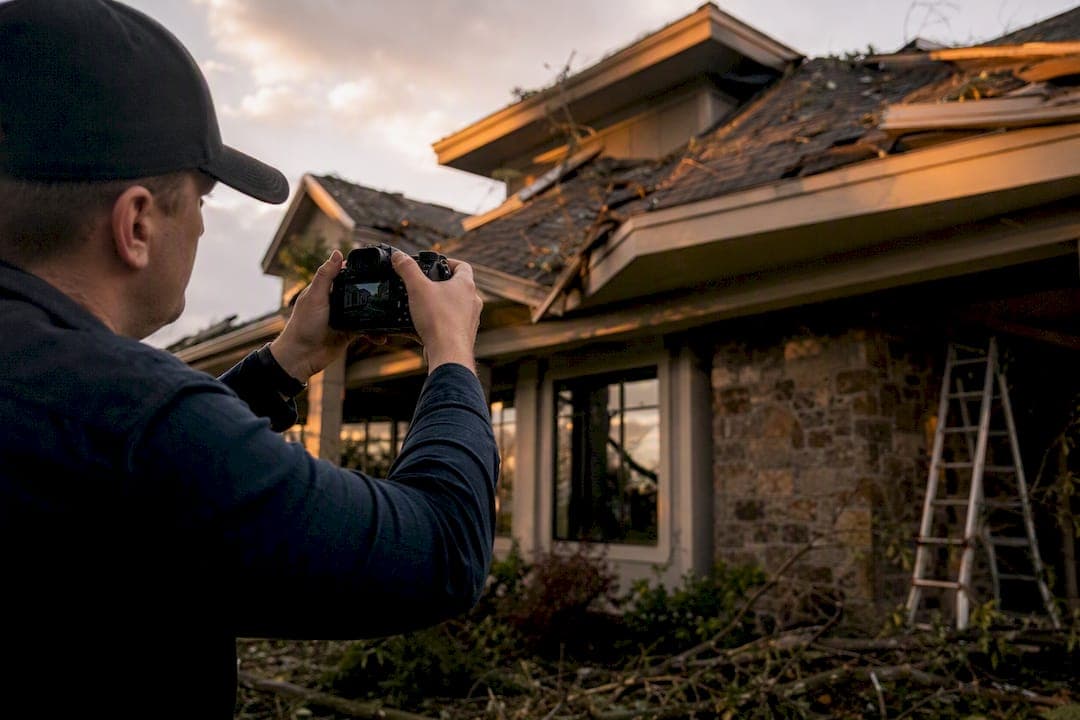
If it's safe to return, document damage now and arrange a professional post storm home inspection within 48 to 72 hours, or no later than two weeks out. Walk the property, photograph everything before you touch a single branch or tarp, and call a licensed inspector or your estate manager the same day. Skip the ladder and the crawl space if there's structural movement, a gas smell, or downed lines nearby; call emergency services or a professional first in those cases.
TL;DR:
- Document storm damage within 48 hours using photos and detailed notes before beginning any repairs, and avoid unsafe areas like downed lines or structural shifts.
- Focus on exterior checks such as granule loss in gutters, missing shingles, or displaced flashing, and photograph damage from the ground to avoid unnecessary risk.
- Inspect the attic and interior for water stains, mold, musty odors, or damp insulation, which indicate hidden damage requiring prompt attention.
- Gather comprehensive evidence with wide and close-up photos, accurate date stamps, and an itemized damage list before cleaning or repairs start for insurance and FEMA claims.
- Hire qualified inspectors with proper credentials; verify scope, turnaround, and documentation format to ensure insurance and claims are properly supported.
Table of Contents
- Exterior and Roof Inspection Checklist: What to Check Safely
- What Interior Signs Reveal About Hidden Storm Damage
- Foundation and Site Damage: When to Call a Structural Engineer
- How Should You Document Damage for Insurance and FEMA?
- When Is It Safe to Inspect After a Storm?
- How to Choose a Qualified Post Storm Inspector
- Why Gutters and Drainage Deserve a Second Look After Every Storm
- How to Spot Mold and Mildew After Water Intrusion
- Steps to Stabilize Damage Before Permanent Repairs Begin
- Detailed Safety Precautions to Follow During Any Inspection
- Checking Electrical Systems Without Getting Hurt
- HVAC and Ventilation: What Storms Damage Most Often
- 30A Property Collective's Perspective on Post Storm Response
- Get Ahead of the Next Storm With Managed Estate Care
- Zackary's Take: The Inspection Timeline Homeowners Get Backwards
- Sources
Exterior and Roof Inspection Checklist: What to Check Safely
Start at ground level. Walk the perimeter of the house and look up, not down, because most of the useful evidence is overhead where you don't have to climb to see it.
Check your gutters and downspouts first. Granules pooling at the bottom of a gutter, or scattered across a walkway, usually mean hail or wind stripped the protective coating off your shingles. That's a genuine red flag even if the roof looks fine from the driveway, and it's one of the checks Owens Corning's storm damage checklist specifically calls out. Look for visibly lifted or missing shingles, dented gutters or downspouts (a decent proxy for hail size), and any displaced flashing around chimneys or vent pipes you can spot from the yard.
- Shingle fragments or granule buildup in gutters and on the ground
- Dented, dimpled, or detached gutters and downspouts
- Lifted, curled, or missing shingles visible from the ground
- Debris impact marks on siding or the roofline
- Displaced or bent flashing around chimneys, vents, or skylights
The roof surface itself is a different matter. Exposed decking, compromised flashing around penetrations, damaged ridge caps, and the difference between hail bruising and wind lift all require someone trained to read them correctly, and that's a job for a licensed roofer or a certified inspector, not a homeowner with a phone camera and a ladder.
Never get on the roof if it's wet, if you see any sagging, or if there are downed power lines anywhere near the structure. None of that is worth the risk. Photograph what you can see from the ground with a wide shot for context, then close-ups of anything specific, and note the storm type and date, since that detail matters later for your claim.
Pro Tip: Photograph the same corner of the roof from the same spot before and after a storm season if you can. Side-by-side comparisons make it dramatically easier for an adjuster or inspector to confirm what's new damage versus wear that was already there.
What Interior Signs Reveal About Hidden Storm Damage
The roof tells you what happened outside. The attic and interior tell you what's happening now, often invisibly, and that's the part homeowners miss because nothing looks obviously wrong from the living room.
Get into the attic if it's safe and look for water stains on the underside of the decking, insulation that feels wet or has gone flat and compacted, and any spot where daylight is coming through where it shouldn't be. Rot along rafters or collar ties is a sign water has been sitting for a while, not just during the last storm.
Inside the house, watch for new stains on ceilings or walls, trim that's started to warp or bubble, musty smells that weren't there before, and carpet or subfloor that feels damp underfoot. Any of these point to intrusion you can't see from outside.
- Water stains or discoloration on attic decking or ceilings
- Wet, matted, or compacted insulation
- Musty odors or visible mold on interior surfaces
- Warped trim, baseboards, or door frames
- Damp carpet, padding, or subfloor
Mechanical systems deserve a specific look too. Check for water pooling near electrical panels, a water heater that's shifted off its base, and HVAC condensers or ductwork that may have taken on debris or moisture. Restoration professionals note that water intrusion is time-sensitive, and delaying extraction gives mold a real head start, often within the first 24 to 48 hours of a wet event. Getting fans running and moisture pulled out early is one of the cheapest things you can do to avoid a much bigger remediation bill later.
Foundation and Site Damage: When to Call a Structural Engineer
Roofs and attics get the attention, but the ground under the house is where the most expensive surprises hide. Walk the foundation perimeter slowly and look for anything new: horizontal cracks, stair-step cracking in masonry, visible separation where the foundation meets the siding, bulging walls, or any section that looks like it's settled lower than the rest.
Soil tells its own story. Saturated ground that stays soft for days, visible erosion or washout channels, and standing water pooling against foundation walls all suggest drainage failed during the storm, not just that it rained hard. Splash blocks and downspout extensions that got knocked out of place will make this worse over the following weeks if nobody puts them back.
- New horizontal or stair-step cracks in foundation walls
- Visible separation, bulging, or uneven settlement
- Standing water or persistent saturation near the foundation
- Erosion, washout, or displaced splash blocks and downspouts
- Uprooted trees, cracked retaining walls, or heaved hardscape
Uprooted trees near the house, cracked retaining walls, and heaved pavers or driveways are all indicators that the whole site took a hit, not just the structure. Root systems that come out of the ground often take a chunk of soil and drainage capacity with them, which can quietly undermine a foundation months later.
If you see any of the cracking or settlement signs above, especially anything wider than a hairline or accompanied by doors and windows that suddenly stick, order a structural evaluation before you sign off on any repair estimate. Document everything with photos and keep those separate from your general storm damage file, since foundation claims often get scrutinized more closely than roof claims.
How Should You Document Damage for Insurance and FEMA?
The single biggest mistake homeowners make after a storm is cleaning up before they've documented anything. FEMA is explicit that photos and video, taken before repairs begin, are what support both FEMA inspections and insurance claims. No photos means no proof, no matter how obvious the damage was in person.
The protocol is simple and worth following exactly:
- Take a wide-angle shot of each damaged area first, so there's context for where it is on the property.
- Follow with close-ups of the specific damage, whether that's a cracked window or a stained ceiling panel.
- Confirm your phone's date and time stamp is accurate, since that metadata becomes part of your evidence trail.
- Write an itemized list of damaged items with your best estimate of value, and keep it separate from repairs already in progress.
- Save every receipt tied to emergency mitigation, temporary housing, or contractor work, and file pre-existing damage notes separately so they don't get conflated with storm damage.
Severity matters for how your claim gets classified. FEMA's own Individual Assistance Damage Matrix uses concrete thresholds, like whether water reached at or above electrical outlets, to determine if damage counts as major. That's not a detail you want to guess at from memory weeks later.
A licensed inspector's written report, backed by dated photos, does more than satisfy your own curiosity. It gives adjusters and FEMA reviewers a documented basis to work from instead of a verbal description they have to take on faith, and that documentation often moves a claim from disputed to approved.
A home inventory built for insurance before the next storm season makes this whole process faster, since you're comparing against a baseline instead of reconstructing one from memory.
When Is It Safe to Inspect After a Storm?
Don't re-enter until local authorities have cleared the area. That's not caution for its own sake. Downed lines can still be live even when the power looks off, and standing water near an electrical service is one of the more common ways people get hurt after a storm has already passed.
InterNACHI's guidance is direct on this: wait for official clearance, document hazards you find, and bring in a certified inspector for the actual assessment rather than relying on a walkthrough alone. Timing matters too. For severe events, aim to inspect within the first 48 to 72 hours. For anything less severe, industry guidance points to a two-week window as the outer limit before evidence starts to degrade or secondary damage complicates the picture.
Know who to call first, because it changes by hazard:
- Gas smell of any kind: call your utility or emergency services immediately, no exceptions
- Exposed or damaged electrical service: licensed electrician before anyone touches a switch
- Structural shift or visible sagging: structural engineer before anyone reenters that area
Pro Tip: Emergency mitigation, like tarping a roof or extracting standing water, is not the same as a full inspection. Do the mitigation fast to stop damage from spreading, then schedule the formal inspection and report separately so you have both a stabilized property and clean documentation.
How to Choose a Qualified Post Storm Inspector
Not every contractor who shows up after a storm is qualified to give you a report an insurer will respect. Look for InterNACHI certification or an equivalent credential, state licensing where your state requires it, and proof of active insurance. Ask to see a sample report before you hire anyone.
Four questions separate a real inspection from a sales pitch wearing a hard hat:
- Is the scope roof only, or a full home and site assessment?
- What's the turnaround time for a written report with photos?
- Do they document specifically for insurance purposes, in a format adjusters actually use?
- Do they coordinate with vendors and contractors, or just hand you a list and walk away?
Red flags are usually obvious once you know to look. An inspector who refuses to photograph anything, offers only a verbal summary, can't produce proof of insurance, or pushes you hard toward one specific contractor should lose the job on the spot. Those are the patterns that leave homeowners with weak claims and repairs that don't match what was actually damaged.
For owners who'd rather not manage this process solo, a managed estate service is worth considering when you need ongoing monitoring rather than a one-time report, someone coordinating vendors on your behalf, or claims documentation handled alongside the physical repairs, particularly for a second home you're not standing in every week.
Why Gutters and Drainage Deserve a Second Look After Every Storm
Gutters do more work during a storm than most homeowners give them credit for, and they're one of the first systems to fail quietly. A gutter packed with debris redirects water straight down the siding instead of away from the foundation, which turns a manageable rain event into a saturation problem at the exact spot you're trying to protect.
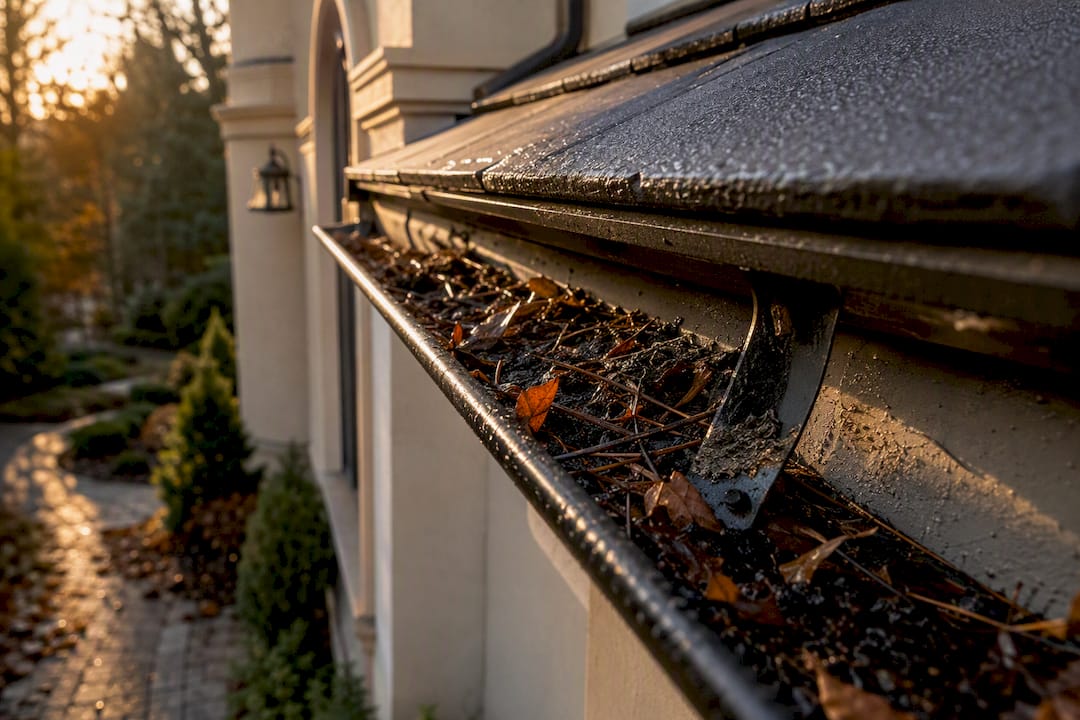
Check that gutters are still securely attached at every bracket, since storm winds loosen fasteners even when the gutter itself looks intact. Look inside for granule buildup, which as noted earlier signals roof wear, but also check for standing debris that's blocking flow entirely. Downspouts should be extending water at least a few feet from the foundation, not dumping it in a puddle against the wall.
Splash blocks and extensions get knocked loose or buried during heavy wind and rain, and homeowners often don't notice until the next storm makes the same spot flood again. Walk the drainage path from each downspout to where the water actually ends up. If it's pooling near the foundation instead of draining away, that's a fix worth making before the next system rolls through, not after.
How to Spot Mold and Mildew After Water Intrusion
Mold doesn't wait for permission, and it doesn't need much water to get started. A damp patch that sits unaddressed for even a couple of days can develop visible growth, especially in warm, humid climates where the air itself is already doing half the work.
Look for discoloration that spreads in irregular patches rather than a clean water stain, usually in shades of black, green, or gray. Musty odor is often the earliest warning sign, showing up before you can see anything at all, particularly in closed spaces like closets, cabinets under sinks, or the attic. Check drywall for soft spots or bubbling paint, since moisture trapped behind a wall will compromise the material long before mold becomes visible on the surface.
Bathrooms, laundry rooms, and any space near an exterior wall that took water deserve extra scrutiny. If insulation stayed wet for more than a day or two, treat it as compromised even if you can't see mold yet, because by the time it's visible, the growth has usually been established for a while. Fabric, carpet, and upholstery that got wet and weren't dried within 24 to 48 hours should be inspected closely or replaced outright rather than gambled on.
Steps to Stabilize Damage Before Permanent Repairs Begin
The gap between "storm just passed" and "contractor starts repairs" can stretch for weeks, and what happens during that gap often determines how much the final repair bill actually costs. Temporary mitigation isn't optional busywork. It's the difference between a contained problem and one that spreads.
Tarp any roof breach immediately if it's safe to access, securing edges tightly enough that wind won't tear it loose overnight. Extract standing water from interior spaces as fast as possible, since every extra hour of sitting water adds to the mold risk discussed earlier. Run fans and dehumidifiers in any area that got wet, even if it looks dry on the surface, because moisture hiding in subfloor or wall cavities won't show up until it's already a problem.
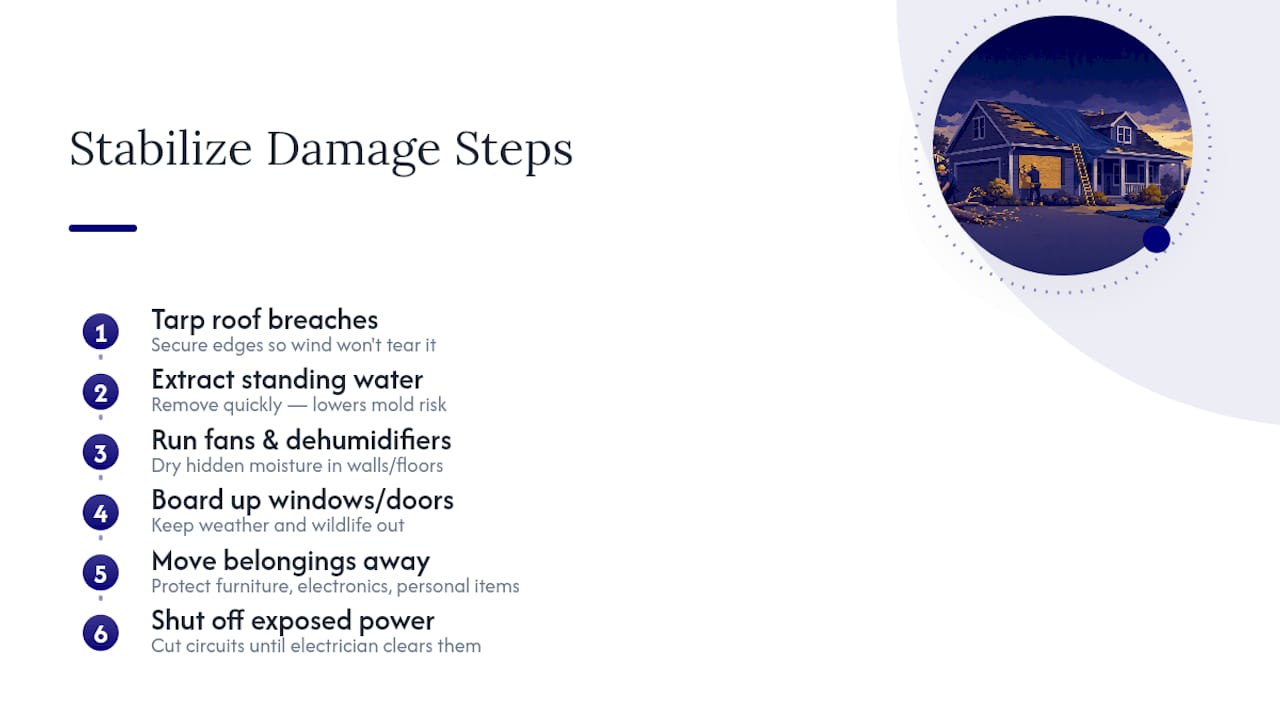
Board up broken windows or damaged doors to secure the property and keep weather and wildlife out — a critical step recommended by Crowley Exteriors for effective post-storm mitigation. Move furniture, electronics, and belongings away from wet areas before they absorb more moisture than they already have. Shut off power to any circuit that's been exposed to water, and don't turn it back on until an electrician has cleared it. None of these steps replace permanent repairs, but they buy you time to get a proper inspection scheduled without the damage getting worse in the meantime.
Detailed Safety Precautions to Follow During Any Inspection
Every inspection carries some risk, but the biggest mistakes happen when adrenaline and urgency override basic caution. Treat every downed line as live, every standing structure as potentially unstable, and every enclosed space as a possible gas risk until you've confirmed otherwise.
Structural instability is the hardest hazard to spot because it doesn't always announce itself. Doors that suddenly stick, floors that feel slightly uneven, or walls with fresh hairline cracks can all indicate the frame has shifted, even when the house looks fine from the curb. If you notice any of these, stay out of that section of the house and call a structural engineer rather than testing your theory by walking through it.
Gas leaks demand immediate action, not investigation. If you smell gas at any point, leave the area immediately, don't flip any switches, and call your utility company or emergency services from outside the structure. Don't try to locate the source yourself.
- Assume all downed or hanging power lines are live, regardless of appearance
- Avoid standing water anywhere near an electrical panel or outlet
- Wear sturdy shoes and gloves; skip sandals and bare hands entirely
- Never enter a structure authorities haven't cleared, even briefly
- Bring a partner rather than inspecting alone whenever possible
Checking Electrical Systems Without Getting Hurt
Electrical damage after a storm is often invisible until someone gets hurt, which is exactly why it deserves its own careful pass separate from the general walkthrough. Water and electricity are a genuinely dangerous combination, and the instinct to just flip the breaker and see what happens is the wrong one.
Look at your main electrical panel from a safe distance first. Any sign of water intrusion, rust, scorch marks, or a burning smell means the panel needs a licensed electrician before anyone touches it. Outdoor outlets, exterior lighting, and any wiring that runs near where the storm caused visible exterior damage all deserve a visual check for exposed or frayed wiring.
Never plug anything into an outlet that's been submerged or splashed heavily, even if it looks dry now. Water leaves mineral deposits and corrosion behind that can cause a short well after the surface has dried. If your home lost power during the storm, don't assume it's a simple utility issue until an electrician has confirmed nothing inside the house was damaged. A professional inspection here isn't a formality. It's the one system in the house where a mistake can be immediately dangerous rather than just costly.
HVAC and Ventilation: What Storms Damage Most Often
HVAC systems take a beating during storms, particularly the outdoor condenser unit that sits exposed to wind, debris, and flying branches with nothing protecting it. A dented condenser coil or bent fan blades can reduce efficiency dramatically even when the unit still technically runs, which means a system that seems fine might already be costing you money and comfort.
Check the outdoor unit for visible dents, debris caught in the fins, or standing water pooling around the base. Listen for unusual noises when the system runs; grinding or rattling usually means something shifted internally during high winds. Inside, check vents and ductwork in any area that took water intrusion, since moisture trapped in ducts becomes a mold risk fast, echoing the same timeline concerns as wet insulation.
If your HVAC system lost power or ran through storm surges, have a technician check it before relying on it heavily, especially before summer heat sets in. Ventilation matters just as much as heating and cooling capacity here. A system pulling air through a duct that's been sitting wet is circulating exactly the kind of moisture and spores you're trying to get out of the house, not the kind you want blowing into every room.
30A Property Collective's Perspective on Post Storm Response
Most homeowners find out how well they prepared for a storm only after one hits, and by then it's too late to fix gaps in documentation. 30apropertycollective's approach treats storm response as something you build ahead of time, through weekly inspections and anticipatory care rather than a scramble after the fact.
Digital property reports change what a claim actually looks like. When an estate has been documented consistently through routine visits, the post-storm assessment has a real baseline to compare against, not guesswork about what was already there. That comparison is often what separates a smooth claim from a disputed one.
Vendor oversight matters just as much. Coordinating roofers, electricians, and restoration crews without the homeowner having to manage each call directly is where a lot of claim friction actually disappears.
Get Ahead of the Next Storm With Managed Estate Care
Handling all of this alone, especially from out of state or during a busy season, is where most storm damage claims fall apart. Missed documentation, delayed mitigation, and juggling five different contractor calls while you're also trying to live your life is a lot to ask of anyone.

30apropertycollective exists for homeowners on Florida's Emerald Coast who want someone already inside the property, week after week, not a stranger showing up for the first time after the damage is done. Because the estate has weekly inspection history behind it, a post-storm assessment starts from real baseline data instead of a cold read, and that difference shows up when a claim gets reviewed. The Concierge service handles the assessment, the vendor coordination, and the documentation together, so you're not stitching together separate calls to a roofer, an electrician, and an adjuster on your own.
If you're managing a property along the coast and want someone already on the ground before the next storm season arrives, start the conversation about coverage and see what a managed inspection plan looks like for your specific estate.
Zackary's Take: The Inspection Timeline Homeowners Get Backwards
Most storm damage guidance treats the inspection like a single event: the storm passes, you check the house, you're done. That framing is wrong, and it's the reason so many claims come back underpaid.
The real story is timing, and specifically the gap between what's visible on day one and what becomes visible by day ten. A stained ceiling tile you photograph on day two might be the only sign of a slow leak that, left alone, causes a mold problem serious enough to require remediation by day fourteen. If your only inspection was the walkthrough right after the storm, you've got a photo of the symptom and none of the progression, which is exactly the kind of gap adjusters use to argue a claim down.
The homeowners who fare best after a major storm aren't the ones who did one thorough inspection. They're the ones who checked again a week later, and again after that, treating the first 48 hours as the start of documentation rather than the end of it. That's a genuinely different mindset than "get it over with," and it's the one thing most generic checklists never say out loud.
— Zackary
Sources
- Fema
- For Home Inspectors and Homeowners: What to Do After Disaster Strikes - InterNACHI®
- Storm Damage Roof Inspection: Complete Step-by-Step Guide | Clean Roofing
- Roof storm damage checklist | Owens Corning Roofing